In this blog post, we will see how to solve the problem if your external hard disk, hard drive, or any of the drives are not detected. First of all, you need to check whether the hard drive is being detected or not. If it’s working, then that’s fine. If it’s not working, then you and I will just show the steps, and you will apply the steps one by one and check. First of all, you need to check where the problem actually lies—is it in the power supply, the drive, the disk settings, or is there a problem with the file system? Alternatively, you need to check whether the USB port you are connecting to is working correctly.
First of all, check the basic steps.
Before changing any settings, please review these steps.
✅ Step 1: Check the USB Cable and Port (Most Common Fix)
🔌Unplug the external hard disk.
🔌Try inserting the drive into a different USB port.
💻 You can check the external drive on another computer.
🔁You can disconnect the cable that is connected to the hard drive and use a different, new cable.
👉 If your USB drive is supported on another computer, then your computer has an USB port problem.
✅ Step 2: Restart Your PC
When your computer restarts, you need to unplug the external hard drive, restart it.
Then when the computer turns on, you need to plug in your external drive and check again.
✅ Step 3: Update or Reinstall Disk Drivers
To go to Disk Manager you have to press windows + x button then you will be shown Disk Manager.
After going to Disk Manager, you will see an option which is Disk Driver. You have to explain it then the hard disk or hard drive that is there will be automatically shown. Then after the driver you have is shown, you have to go there and right click on it and do something like Update Drivers. This will fix any driver mismatches in your computer’s hard drive. Then you have to restart it once to see if it worked or not.
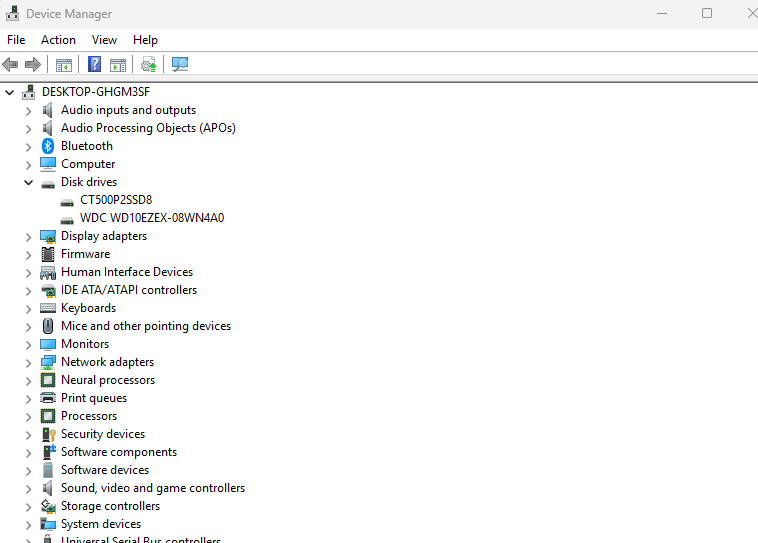
If the option does not work, then after restarting you will have to go to Disk Manager in the same place, after going there, uninstall the device and restart once. After restarting, it will be installed automatically.
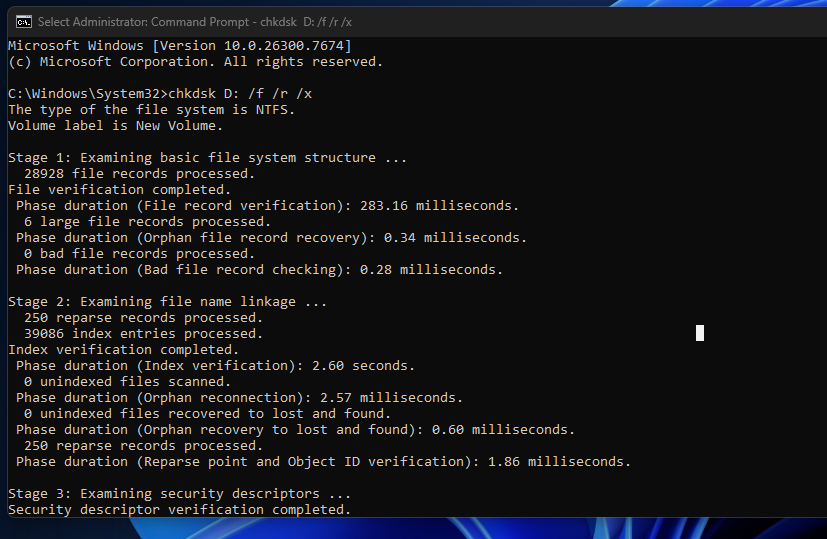
✅ Step 4: Run CHKDSK to Repair Disk Errors
First of all you have to type Windows + s then search CMD then you have to right click and open Run as administrator.
chkdsk D: /f /r /x(Replace D: with your external drive letter)
Meaning:
/ffixes errors/rrecovers bad sectors/xforces drive dismount
👉 This may take time depending on disk size.
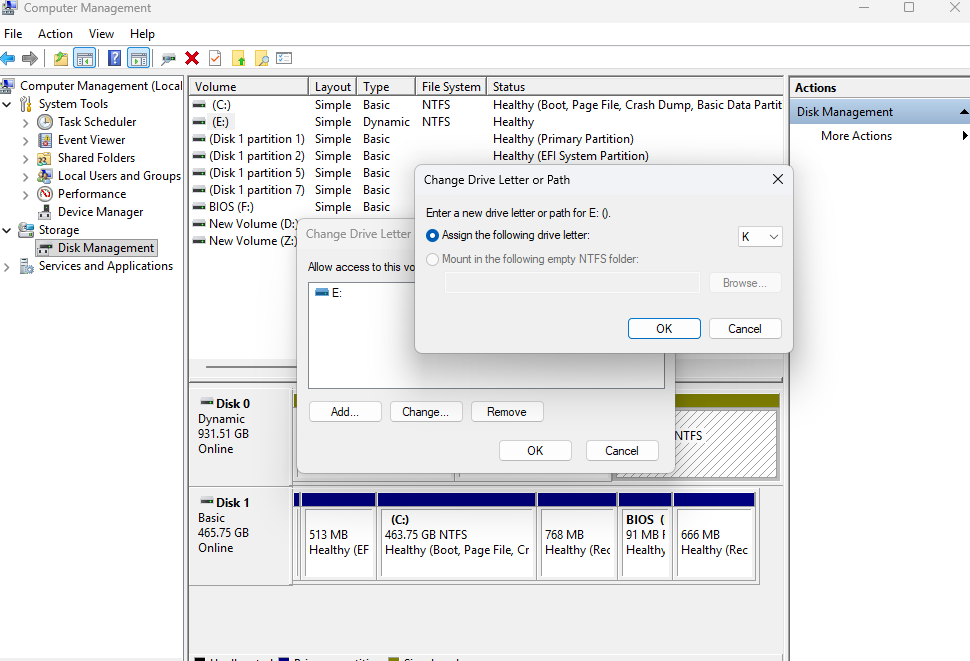
✅ Step 5: Change Drive Letter
First of all, you have to press the Windows + X button, then you will Open Disk Management, go there and select the external drive. Then Click Change Drive Letter and Paths & Click Change Select a new letter (like D or F)
Conclusion:
Very simple and very easy method we have shown you to do this yourself easily, Very simple and very easy method we have shown you and you can do this thing yourself and we have presented this blog to you for better improvement and experience and from the information provided in my blog, you can customize any picture, any picture in this way, you can easily change it.
NOTE: When you follow my steps it is very important to keep your computer.
If you have benefited from the information given to me, then you can follow my website. If you want to see such type of things first, then follow my website.
Also, I publish these types of things to you through YouTube. If you have difficulty in reading and understanding, you can subscribe to my YouTube channel. You can also watch the same video on YouTube.
If you want to watch videos in Hindi, click on the link given below this Blog.